Sunday, March 27, 2011

Swedish Meatballs

I would love to tell you that I have this fabulous recipe for meatballs that I love and use all the time.... except I don't. The truth is, I have never in my life made meatballs. Mostly because I don't care for homestyle meatballs, and since that's what most people make, I thought that the only way to get the flavor I liked in a meatball, was to purchase them pre-made at the store. I have since learned otherwise, but have yet to try my hand at making the perfect meatball.
Anyway. So tonight, as usual, I was strapped for time. More than usual, actually, since I worked late, leaving me about 20 minutes to make dinner for my dad before he had to return to work. I decided to make swedish meatballs. They taste good, and I knew we had some meatballs kicking around in the freezer. I also was pretty sure we had everything we might need to make said meatballs, so I headed home to begin.
I started by looking up a recipe for swedish meatballs. Most everywhere reccomended that I make my own meatballs, but I disregarded that part and skipped to the sauce. One particular recipe I found called for a can of Cream of Mushroom Soup, a can of Cream of Chicken Soup, and a can of Evaporated Milk. I knew we had all these things, so I began.

Now began the adventurous part of the meal. After I put the water on to boil for the noodles, and set the meatballs to defrost, I checked the can of Evaporated Milk. I knew it had been in our pantry for awhile, and I wasn't certain as to it's reliability. The "best by" date was stamped on the bottom, and revealed the can to be... 2 years expired. Hmmm. How bad could it really be? It's canned, right? Can't be that bad! Just to be certain, I googled information about evaporated milk gone bad, and found several succesful stories of past due evaporated milk being used, and enjoyed, and no one dying afterward, which is after all the most important part.
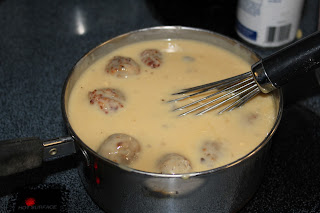
So I mixed the soups and the milk, and then added the defrosted meatballs.

I let them simmer for awhile while I cooked the noodles. I picked shell pasta because it was what we had in the pantry. :P

Once the noodles were done, I poured the meatballs and broth over them and served it.

It was very good. :D

Friday, March 25, 2011

Mexican Beef Casserole

The other day, while browsing the grocery store for some good ideas, I came upon a can of Fiesta Nacho Cheese soup. It was with all those cream soups that Campbells makes, and it looked like it had the makings of a good meal in it, so I got it and placed it on the shelf at home, waiting for inspiration to strike. The other night, it did.
I needed something quickly, since I have about a 1 hour window in which to make and serve dinner, so I grabbed a pound of frozen beef from the freezer and browned it.


Once it was done, I added the can of Fiesta Nacho Cheese Soup (With a name that exciting, it had to be good, right?) and mixed it in. Meanwhile, I boiled up some water for noodles.
The beef was looking a bit dry, and a bit blah, so I threw in a can of Cheddar Cheese soup, a can of Tomatoes with Green Chiles, and a handful of chopped chives. Notice the handwritten warnings all over my soup cans. This is because I have brothers who like to steal my cheddar cheese soup for their own evil purposes. >_<


It looked much better, and much more festive after that. By this time, the water was boiling, and I cooked some egg noodles while keeping the meat mixture warm. When the noodles were done, I deliberated over whether I should mix them in, or serve the meat over them, and finally decided to just mix them in. The result appeased my love of all things colorful. :D

Being a mexican meal, I served it with tortilla chips.


It wasn't bad. And this from a girl who can't stand things that are too spicy. And this was spicy. Really spicy. Even my dad said so, and he likes spicy food. I didn't mind too much, though, since I mixed in a ton of sour cream to cut the spice. I love sour cream anyway. :D
I'm not sure I'd make it again, or if I did, I might use different noodles, and perhaps forgo the Fiesta Nacho Cheese as well, just to cut down on the spiciness. I'll have to figure out something else to use that soup in.

Thursday, March 24, 2011

Chicken and Cheese Crescents

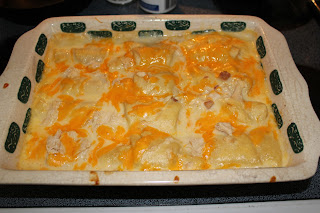
Before I begin this blog, let me just point out the new stoneware pan I just got. It was in a pile of free stuff on a table at our church. I'm rather excited about it. It has apples. I love appley kitchen stuff. *is ridiculously pleased with new pan*


Anyway.... so the other day I was trying to come up with a quick easy recipe for dinner. We didn't have much in the house, and I didn't have much time. I opened the fridge to see what I could come up with. We had some chicken I had boiled the other day in preparation for.... whenever I might need it. There were also some crescent rolls, ready to be made. I had no idea what I could make with these things, but I went to my favorite recipe site, www.allrecipes.com, and plugged in these two ingredients. The first thing that came up was something called Chicken and Cheese Crescents.

Preheat Oven to 350˚ F

1 (4 pound) whole chicken, cooked and deboned
2 cans condensed cream of chicken soup
2 1/2 C. milk
1 C. shredded cheddar cheese
2 cans refrigerated crescent roll dough

It looked good, and easy, so I decided to give it a try. I made it, and promptly realized I had forgotten to take any pictures. No problem. It was a liked recipe, so I just made it again a different time. :D

I started by shredding the cheese, and putting the milk, half the cheese, and the cream soups into a pot on the stove and cooking them until the cheese was melted, and all the ingredients were combined.


Next, I opened up the crescent rolls. Now, the recipe calls for a whole chicken. I had not a whole chicken. Either the first time, or this time. The first time, I had some pre-cooked chicken breasts that I shredded up. This time, I resorted to canned chicken. It was easy, and it tastes fine. I took each crescent roll triangle and piled some chicken and a pinch of the leftover cheese on the wide end and rolling it all up inside. I tend to pile the chicken and cheese rather high.


When I had rolled them all up, I put them in my beautiful new stoneware pan, which I had previously greased. You may notice there are not 16 here, which is the proper count from two cans of crescent rolls. You are correct. The other four had been cooked the evening before to accompany my dinner. ^_^


The next step was to take half of the gravy mixture stuff I had just finished cooking and pour it around the crescent rolls. Not on them, just around them.


Into the oven they go! I baked them for about 15 minutes, then pulled them back out. They're starting to puff up nicely.


The rest of the broth was then poured on top and layered with the any remaining chicken or cheese.


I put them back into the oven. The recipe says to cook them until the cheese is melted and the rolls are brown. However, as you can see here, the rolls were no longer visible, and were not likely to be getting very brown anytime soon. So I guesstimated at 10 minutes. I was wrong. It took closer to 15. I might even recommend 20. The rolls will be a bit soggy, obviously, but they won't  be undercooked.


Looks delicious!


I must say, this is one of my favorite recipes. Relatively quick, fun to make, very easy, and quite good. Throw a salad on the side, as you see here in my serving suggestion, and voila! Dinner. :)

Wednesday, March 23, 2011

Vegetable Dip

Every Friday night, I go to bible study. We meet in a friends home, and every week someone else takes a turn preparing and bringing snack. This week was my turn, so I decided to put together veggies and dip. Never really feeling like buying a tub of prepared dip with all sorts of delicious chemicals in it, I decided instead to make my own. Of course, Ranch Dip is the undisputed leader in the world of Veggie Dips, so it was to a new recipe app on my phone that I looked. Ya know, there really is an app for everything these days.
I discovered a delicious looking recipe for ranch dip, and set about to put it together.

3/4 C. Sour Cream
1/2 C. Mayonnaise
1/3 C. Fresh Chopped Parsley
1/4 C. Fresh Chopped Chives
1/4 tsp. Minced Garlic
Dash of Salt
Dash of Pepper

I started by preparing the parsley and chives. I discovered that I had no fresh parsley, but I did find some dried parsley in the cabinet, so I decided to use that. I worked out just fine. Then I chopped up the chives. I love chives. In fact, I often will substitute green onions instead of regular onions in some recipes.


Next, I mixed the mayonnaise and sour cream with the greens.


Then I added the garlic, salt and pepper.


I mixed it up and stuck it into the fridge for a bit to let the flavors mix. Also because the parsley needed to soften up.


After it was chilled, I arranged the veggies on the plate and took it to the bible study.


Everyone seemed to enjoy it. I know I did. :)

Wednesday, March 16, 2011

Blueberry Pi(e)

The other day, it was March 14th. For those of you not considered to be either a geek or a friend of a geek, let me share something with you. March 14th is Pi Day. Why, you may ask? Well, because March is the third month, making it 3/14. Which is Pi. It will be especially exciting on March 14th in 2015. :D
But I digress.
Now, being Pi day, I felt compelled to do something Pi-ish. Taking an important math test for college wasn't enough, so after I returned from school, I set to work in the kitchen. Pizza Pie and Blueberry Pie were both on the menu, but since I've already done a blog on pizza, I will only include here the Blueberry Pie recipe.

I started with a pie crust. I used to have a marvelous pie crust recipe from my grandmother, but I've lost it, and she wouldn't answer her phone, so I couldn't get it again. In the meantime, I pulled out our worn, well loved Better-Homes-and-Gardens cookbook.

2 C. All-purpose flour
1/2 tsp. Salt
2/3 C. Shortening
6-7 Tbsp. Cold water

I started by mixing the flour and the salt. Then I cut in the shortening, until it was forming small balls and coming out crumbly. The next step was to add the water. Throw it on top and gently toss with a fork until it's about the right consistency. What is the right consistency? Well, when you think the water is pretty well mixed in, smoosh half of the dough into a ball with your hands and put it onto your floured table or countertop. Roll it out. If it crumbles to smithereens and doesn't roll out well at all, you probably added too much flour. If it sticks all over the rolling pin and you're making an enormous mess, you probably didn't add enough, and need to add a bit more flour. Or you just need to flour the rolling pin better. Or both. :)


Once you've got it all figured out and rolled out, it's time to line your greased pie pan with it.
Then it's time to add the fruit. I was using blueberries, but obviously, this pie crust could be used for just about whatever you please. I'll have to share my Chicken Pot Pie recipe some day. :D
I started with a big bag of frozen blueberries. Fresh blueberries would have been much better, but seeing as it's March, blueberries are out of season, and I'm too poor to splurge on out of season fresh blueberries, I had to make due with frozen.

5 C. Fresh (or frozen! :P) blueberries
1 C. Sugar
1/4 C. All purpose flour
1 tsp. finely grated lemon peel
2 tsp Lemon juice
1 Tbsp Butter

I measured out the blueberries and mixed it with the sugar and flour. I actually ended up cutting the sugar amount down to about 3/4 Cup, and it tasted just fine. You could even cut it down further, if you wanted. The blueberries are pretty sweet on their own. Where it called for grated lemon peel, I just put in a splash of lemon juice. I had no lemon peel handy. I rarely do, and lemon juice has always served me well in this respect.


Then, I poured them into the pie crust and dotted the top with butter. I probably more than doubled the butter, but I like butter. :D
Once the blueberries were in, I rolled out the second crust and put it on top. You could do a lattice top if you wanted, but I had a specific purpose in mind for the slits in the top of this pie.


Yeah, so I'm a geek. :P
I baked the pie at 375˚ for 20 minutes with foil around the crust. Actually, I don't use foil. I use a pie crust shield. I love it. It makes pies so very much easier. My grandmother bought it for me for Christmas a few years ago, and it was a huge joke because, crust shield or not, my grandmother always scorches the edge of her pie crusts. Other than that, though, her pies are the best in the world. :D
Anyway, I baked it for 20 minutes, and then took off the crust shield and baked it for another 20-25 minutes, as per the recipe.
However, it was not done in 25 more minutes. Or 5 minutes after that. Or 5 minutes after that. Or... well.... it ended up taking more than 15 extra minutes for the pie to look done. Even then, I think I could have probably gotten away with 5 minutes more without burns. I'm not sure why it took so long, since I've made pies before and never had this problem, but oh well. It sure looked good!


I put the pie up to cool for a bit while I made dinner, and after dinner we each had a slice with some cream I had whipped up special for the occasion.

Monday, March 14, 2011

Curry Chicken Salad

I have a favorite coffee shop. They have really good coffee. And muffins. And many many other things. One of their specialties is Curry Chicken Salad. Oooooh, it's good! So one day, I got a hankering to have some. Only problem was, I was at home, and really didn't feel like going out. No problem, I'd make my own! I quickly searched all my favorite recipe sites for a good recipe. Many of the recipes called for mango chutney. Well I certainly didn't have any of that, so I kept looking. After wading through many many different recipes, I found a decent looking one of www.cooks.com.

2-3 boneless chicken breasts, skin removed
2 stalks celery, strings removed
1/4 cup fresh cilantro, chopped
1 cup real mayonnaise (not salad dressing)
1/2 medium onion, finely minced
1 teaspoon curry powder
2 cloves garlic, minced
paprika (optional)

Now, before you get all excited and take this recipe and go make it, let me warn you. I did not follow it. Recipes are more like guidelines, anyway! :D
It started with the chicken. I didn't have any chicken breasts, so once again I resorted to a 12.5 ounce can of canned chicken. I'm sure it would have been better with real chicken, but I worked with what I had on hand.
Next, I began in on the other ingredients.


I got the celery and began to remove the strings. Now, I have never done this before. I wasn't even sure how. I had to go online to figure it out. Once I figured it out, I started in on peeling my celery. Who knew celery even needed to be peeled? :P
I wasn't halfway through the first stalk when I called it quits. I decided I rather like the celery strings.
The next thing I changed was the cilantro. I didn't have any. Once again turning to the world wide web, I discovered parsley to be an acceptable substitute. I was fully intending to throw in some dried parsley, but must admit I completely forgot. So much for that.
Then I attacked the onions. What did they ever do to me, you may ask? Well, I happen to not be a big fan of raw onions. Raw scallions, however are a different matter. We have wild scallions in the yard, and I've been known to walk around chewing on them during the Summer. Oh so good. So I added the word 'green' to the recipe and chopped up the scallions.

But I wasn't done there, oh no. More things in this recipe needed changing! First came the garlic. No garlic cloves on hand made me turn to my trusty jar of minced garlic in the fridge. As with the chicken, real garlic cloves would no doubt have been better, but this was wasn't bad.
So pretty much the only thing I kept according to the recipe was the mayonnaise. Even the curry got changed, but I'll get to that in a minute.
So I took all these ingredients and piled them into my bowl.


After mixing them up, I tasted it. Hmmm.... not enough curry. I added more, and then some more. All in all, I estimate I put in just over a Tablespoon, instead of the called for Teaspoon.
The only thing I regret is that I had no red grapes. I really think they would  have made this recipe perfect. I can't complain, though. It was delicious! I put it in the fridge for a while and served it that evening for dinner along with some homemade bread.


It was definitely a success. Have to say it's one of my favorite recipes so far. :D

Sunday, March 13, 2011

Chicken and Bacon Sandwiches

My absolute favorite meal in the world is Chicken and Bacon. It's a special recipe my mother makes. I'll probably make it and post it some day, but for now, I decided to put a spin on it. The original recipe takes 3 hours just to bake. When I started making dinner, I wasn't sure exactly what I was making, but I had chicken, sour cream, and cream of mushroom soup. I love all three of those things, so I was sure I'd be able to come up with something.
While digging in the freezer for inspiration, I discovered a pound of bacon. That's when I decided to alter the original recipe and see how it worked.
I started by cooking the bacon. I always prefer to cook my bacon in the oven.


Next, I mixed a can of Cream of Mushroom soup, and about a cup of sour cream. I wasn't really sure how much sour cream to put in, so I kinda guessed. It worked out pretty well.


When the bacon was done, I chopped up about half of it. The other half I put in the fridge, and my family enjoyed it the next day for breakfast.


I took about 3 pieces of chicken breasts and that I had cooked earlier, shredded them, and spread them in the bottom of a greased pan. This pan is a bit smaller than a 9x13, but a couple more pieces of chicken, and a regular 9x13 pan would have worked well.


Then I mixed the bacon bits with the sour cream and soup mixture, and poured it over the chicken, mixing it together.


I stuck it in the oven for a few minutes. Since all the ingredients were pre-cooked, I mostly just cooked it on a low setting until it was warm. Then I found some rolls, cut them open, and served the chicken mixture with the rolls. Then I ended up putting the chicken on the roll and eating it as a sandwich.


It was very delicious. Tasted almost like the regular Chicken and Bacon meal. Definitely something I'd make again. :D

Chicken Pasta Salad

I love pasta salad. Especially in the Summer. Well, in case you didn't notice, it's not Summer, but I decided to make some pasta salad, anyway.
I started with some Garden Pasta. It pretty much tastes the same as regular pasta, but it's more colorful. :)


When that was done, I added about a cup of Miracle Whip, a handful of celery, a handful of cubed mozzarella cheese, and about half a cup of shredded chicken.


Then I mixed it all together,


It turned out pretty good.


Something I may keep fiddling with, but I like it pretty well.

Saturday, March 12, 2011

Crockpot: Cheesy Chicken and Broccoli

I've been rather relaxed about blogging here, of late, but the time has come to once again begin posting recipes. I have actually made quite a few things recently, and hope to upload them soon.
The first recipe is, once again, a crockpot recipe. In case you haven't noticed, I really like crock pot recipes. This particular one I pulled off of the internet. I was looking for a good recipe to make with the ingredients I had on hand. Namely, frozen chicken, several cream soups, and broccoli.
I love broccoli, but I had recently purchased a lot, and was afraid I wouldn't get around to eating it before it went bad, so i decided to use it up. A good looking recipe popped up almost immediately, and I proceeded to put it together.

I started with the cream soups. The recipe called for Cream of Broccoli (although the recipe said any basic cream soup, such as Cream of Chicken, or Cream of Celery, could be substituted. This was good, since I hadn't any cream of broccoli. I substituted the Cream of Celery and moved on. The other thing it called for was a can of Cream of Cheddar Cheese.
Now, this is a particular kind of soup that, as far as I know, is only made my Campbells. It's very good, and I knew I had bought a can recently, so I began to search through the cabinets to find it. No such luck. I searched more and still could not find it. Time was ticking, and I knew I'd have to leave for work soon, so I quickly googled a solution to my problem. (I later discovered that my brother had used the soup to make himself some cheese fondue sauce)

Luckily, Cream of Cheddar Cheese soup seems to not only be just a Campbells thing, but also only a North American thing. Several substitutions were suggested, including a mixture of evaporated milk and shredded cheddar cheese, cooked on the stove until the cheese melted. I tried this and the result was delicious. :D


So I took this cheese mixture, plus the celery soup, and poured it on top of several frozen chicken breasts, and then set it to cook for about 6 hours on low.


When it was about 2 hours away from being done, the broccoli got added.


Rice was made a few hours later. I love rice. ^_^


It looks pretty good!


Now, I have to say, this was not my favorite recipe. However, it's not because it's a bad recipe. It's mostly because I'm not a huge fan of cooked broccoli. It was hailed as a success by my taste-testers, though, so I imagine if you like broccoli, you'd probably like this very much. :D